Table of Contents
User Support Service
Adding a support request
Adding a support request from a report
- Open the report you would like to submit a support request for.
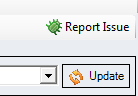
- In the top right corner of the report click on Report Issue.
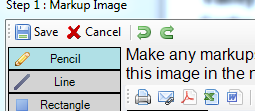
This will take a screenshot of the report you are viewing and open it in a simple image editor. You can use this editor to highlight the changes/problems with the report. - When you are finished marking up the screenshot click the Save button in the top left corner of the image editor.
- Choose Report New Issue to submit this as a new request. This will open the Add Item window.
- Fill out the form with the details of your support request.

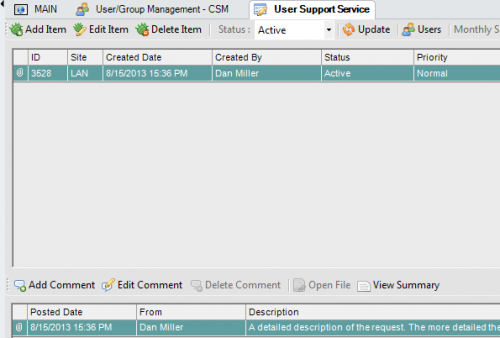
- Subject: This is the title of your request. IE: New efficiency report for the Sawmill
- Description: A detailed description of the request. The more detailed the better.
- Add File: You can add files to the request to better explain what you are requesting. Files that are commonly added are marked up images that visually show what you are requesting and text documents that better detail the request.
- Priority: This priority level of the request. Almost all requests are Normal priority.
- Status: This should be set to Active for new requests.
- Click Save.
Adding a support request from the Navigation Tree
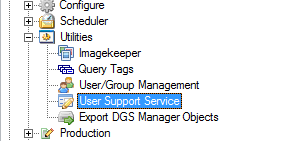
- Open DGS Manager and click open the Navigation Tree on the top left of the screen.
- Click on User Support Service.
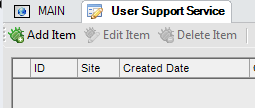
- Click on Add Item in the top left corner.
- Fill out the form with the details of your support request.
- Subject: This is the title of your request. IE: New efficiency report for the Sawmill
- Description: A detailed description of the request. The more detailed the better.
- Add File: You can add files to the request to better explain what you are requesting. Files that are commonly added are marked up images that visually show what you are requesting and text documents that better detail the request.
- Priority: This priority level of the request. Almost all requests are Normal priority.
- Status: This should be set to Active for new requests.
- Click Save.
Adding a comment to a support request
Comments are used to add more details and communicate after a request has been made instead of making a separate request for the same item.
- With the User Support Service tab open, click on Add Comment.

- Type in the description field the comment you would like to add. You can also add additional files such as images and documents by clicking the Add File button
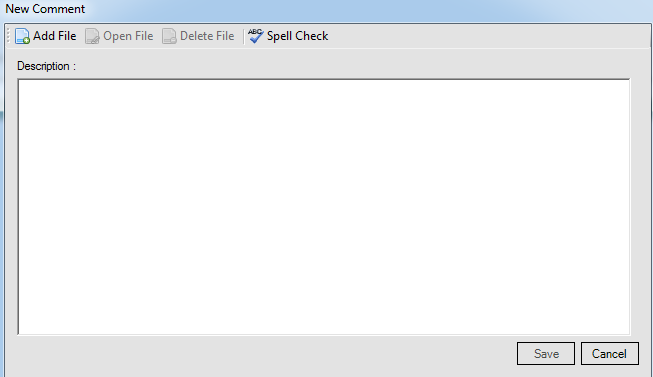
- Click Save to save your comment.
Editing a support request
You can edit a support request after it has been created to make minor changes, add small details, or change other properties such as “Status”. Typically the comment sections is used for any major changes to a support request.
- With the User Support Service tab open, click on Edit Item.
- Make the changes to the support request. Descriptions of the fields are under the “Adding a support request” section of this page.
- Click Save to save your changes.
Deleting a support request
- With the User Support Service tab open, click on Delete Item.
- A prompt will appear asking you to confirm that you want to delete this item.
- Click Yes to delete the item.
Filtering the list of support requests
The list of current support requests is filterable to more easily find the requests you are looking for.
- Hover over the field you wish to sort by, then click on the black arrow that appears.
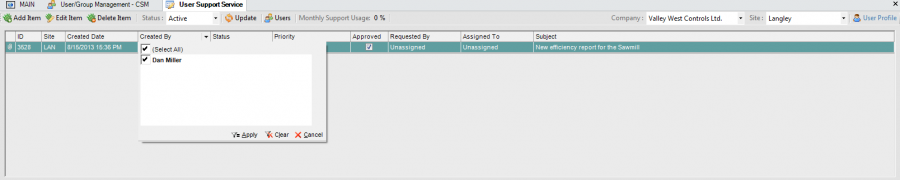
- Use the checkboxes to choose which results you want to be displayed.
- Click Apply to apply the filter.
- The fields that are filterable are: Created By, Status, Priority, Approved, Requested By, and Assigned To.